PathAway version 3
User Manual
Last Updated: May 22, 2003
Table of Contents
Getting Started
Before starting the tutorial, you should have downloaded and installed the PathAway software, PathAway PC tools, and the sample data, maps, point icons, and vehicles in either gray scale or color format.
Ensure all of the components are in your HotSync® folder by running the Palm desktop Install tool.
HotSync® to your Palm Powered™ device.
Now, try following the short tutorial to get an overview of PathAway's features.
Tutorial
Be sure you have downloaded and installed the PathAway optional components. To determine what maps and other data is stored on your device, go to the Options menu and first select Maps. This will show you all of the maps installed on your device.
From the device home page, tap on the PathAway Icon ![]() to start the application.
to start the application.
Screen Views
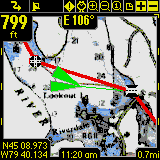
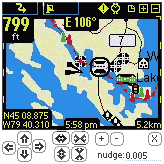
The first screen you see is the Full Screen Map View. PathAway has 5 different views. To see the different views, select PathAway's menu bar. Note, on most Palm Powered™ devices you can bring up the menu by tapping the title bar, otherwise select the menu icon button. Choose the View menu. Now choose one of the four screen views listed. Here is an overview of what you will see.
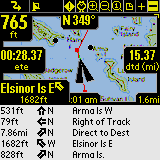
 Full
Screen Map View
Full
Screen Map View
Utilizes most of the screen to show as large a map area as possible. Long/Lat,
speed, elevation, and direction of travel are displayed. This data is
the �navigation� data in the program.
![]() Tracking
View
Tracking
View
Shows the map and navigation data. Default travel stats are trip
time and distance, current, average, and maximum speed.
 Proximity
View
Proximity
View
Shows the map and �navigation� data, plus full info for point and
route proximity. Time and distance to destination, and next point on track
are shown. Position off or on track is also displayed.
 Route
View
Route
ViewShows the map and �navigation� data, plus full info for point proximity. As you approach a point, distance from and course to are displayed. Points in proximity are displayed by closest point.
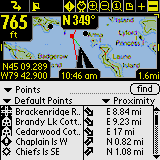
Point View
Shows the map and �navigation� data, plus access to the point/route
and track databases. Useful for selecting items from the databases and
displaying them on the map or placing them into a route. Details such
as Position, Proximity, Elevation, Time, Leg Time, Leg Distance, and Leg
Speed can also be displayed.
Choosing a Route
The sample data includes a route for you to try out. Go to the Options menu and choose Route. Select the route entitled Footes Bay to Rosseau. You're about to take a nautical tour through the lakes of Muskoka Canada!
 Press
OK to return to the main screen.
Press
OK to return to the main screen.
You should see a red line on the map at Footes Bay. That is your route line. A route is a series of points connected together indicating a travel route. When navigating you'll follow this route to get to your destination.
Simulating Navigation
PathAway provides a nifty feature to animate your route before actually traveling. Under the GPS menu, Select Simulate. The travel simulation has begun. The simulator works just as if you are actually traveling. In fact, if you're following a recorded track, the simulator will display the actual speed and time. (See Following Tracks later on in this section).
Watch the simulator until it stops at your destination, the town of Rosseau.
Note: When you're actually connected to a GPS, you'll see a blue line indicating your line of travel. This is your recorded track. Each dot on the line represents a recorded point.
Try running the simulator with the different views. Each view shows you a different set of interesting information. See Screen Views for details.
Scrolling Maps
Maps in PathAway can be larger than the screen, so scrolling maps is important. Besides scrolling automatically as you move, maps can be scrolled using your stylus in 2 ways.
 1.
Tap and drag a point on the map to drag the map around. Release the stylus
when you've reached the position you would like to view.
1.
Tap and drag a point on the map to drag the map around. Release the stylus
when you've reached the position you would like to view.
2. Tapping and holding on the edges of the map will scroll the map towards the edge tapped on.
Try it out. See if you can find the Joseph River on the map. Scroll the map by following the red route line.
Tip. To quickly go to the start or end of your route, go to the Goto menu and select Goto Start of Route or Goto End of Route.
Changing Map Views
There are two different ways to change the view of the map:
-
By zooming in or out of different maps or
- By scaling the current map. ie: Expanding or Shinking the current map.
1. Zooming Between Maps
You can install as many different maps as you like into PathAway. PathAway
will organize and layer the maps depending on the scale and geographic
coordinates of the map. Think of the maps as if they are organized from
above the surface of the earth. When you are up very high, you see a wider
area. Moving closer (or down) you see less area and more detail. So Map
Zoom In or ![]() moves you closer, and Map Zoom out
moves you closer, and Map Zoom out ![]() moves you further away.
moves you further away.
When you have two or more maps within the same geographic location that you are centered on, you can switch in and out of these maps in one of the following ways:
- select the
 or
or
 buttons or
 - press the hard Up (out) or Down keys (In) or

- select an area of the map to bring up the PopUp Menu. Choose "Map Menu >" from the list, and select Zoom Map In, or Zoom Map Out or
- selecting an area of the map, Choosing "Map Menu >" from the pop-up menu, from the Map Menu > select "Choose Map >" and select the map by name.
 The
samples come with a few different resolutions of maps. The
The
samples come with a few different resolutions of maps. The ![]()
![]() buttons at the top right of the screen allow you to move into and out
of these stacked maps. You don't need a map to increase or decrease the
view, but if there is a map available, it will be shown. These buttons
change shape to show you whether there is a map available.
buttons at the top right of the screen allow you to move into and out
of these stacked maps. You don't need a map to increase or decrease the
view, but if there is a map available, it will be shown. These buttons
change shape to show you whether there is a map available.
A highlighted zoom ![]() button indicates there is a map available. A unhighlite zoom
button indicates there is a map available. A unhighlite zoom ![]() button means there is not. Scroll around the Joseph River. You'll see
the buttons change. When the
button means there is not. Scroll around the Joseph River. You'll see
the buttons change. When the ![]() button changes to
button changes to ![]() ,
press it. You'll be shown a closer up view of the river. You can also
select maps by name by going to the Options-Maps dialog, selecting
a map, and pressing the Display button.
,
press it. You'll be shown a closer up view of the river. You can also
select maps by name by going to the Options-Maps dialog, selecting
a map, and pressing the Display button.
Please note, moving between stacked maps should not be confused with map scaling where you zoom into or out of a single map by expanding or shrinking the map. The scaling of maps is done via the magnifying icons.
2. Scaling a Map (Expand/Shrink)
As of PathAway 3, you can now expand or shrink your maps on the view screen to show a wider area or to get "close" to a location, while still rendering a view of the map. This operation is recommended for handhelds with higher processing power and internal memory, but is available for all devices. To scale maps use one of the following methods:
- select the
 or
or
 buttons or
 - selecting an area of the map, Choose "Map Menu >" from the pop-up menu, and select Zoom Scale In, or Zoom Scale Out.
When you zoom in, all of the map pixels are expanded to show you a closer
look at the area. When you zoom out, you will see a wider view of the
map. To return to the original map pixels select the Scale 100% icon ![]() on the tool bar, or select the Popup menu > Map Menu >
Scale 100%
on the tool bar, or select the Popup menu > Map Menu >
Scale 100%
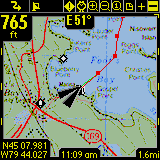
 Improving
Visibility of Navigation Lines
Improving
Visibility of Navigation Lines
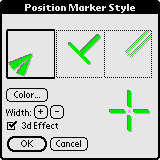
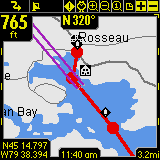
You may notice the screen above has a thicker route line and larger position marker. This is because the Color and Lines settings were changed to improve the visibility of the route line on the map. To do this, choose the Options - Preferences menu, select the preferences category dropdown and choose colors Color and Lines. Here you can change the way the lines and colors on the maps are displayed. If you have a color device, you can create easy-to-read contrast between your maps and route and track lines. Experiment with this option until you've found a view that suits you. You can even change the look of the current Position Marker by selecting between 3 different styles.
 |
 |
 |
 Capturing
Points on a Map
Capturing
Points on a Map
Run the simulator until it stops at the town of Rosseau. Lets say there is a marina close by that you'd like to mark for future reference. I.e. you're almost out of gas and can't afford to go searching for the nearest marina.
Center the map at a shoreline near Rosseau. Press the Add Point ![]() button. The Edit Point dialog is displayed. Here you can enter
information about this point such as its name, description, icon, position
and elevation. Position will be already entered because the point has
a location on the map. If you were actually tracking using a GPS,
the true position and elevation would be entered.
button. The Edit Point dialog is displayed. Here you can enter
information about this point such as its name, description, icon, position
and elevation. Position will be already entered because the point has
a location on the map. If you were actually tracking using a GPS,
the true position and elevation would be entered.
Alternatively, you can tap a point anywhere on the map. A menu pops up
with some options. Select Add Point. 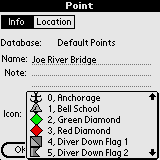
Tip. You can also add a point to the map by pressing
the "Calendar" hard key.![]() .
Press the key again to save the point and exit the Edit Point dialog.
This is a quick way to capture a point as you travel. You can go back
to the point later to enter its other details.
.
Press the key again to save the point and exit the Edit Point dialog.
This is a quick way to capture a point as you travel. You can go back
to the point later to enter its other details.
One of the coolest features of PathAway is that you can use your own
icons to display your points on the map. In the Edit Point dialog,
select the Icon popup. You'll be shown a list of available icons available
to attach to a point. If you installed the icons.prc database,
an extensive list of icons will be displayed. For the marina, choose the
Gas Station ![]() icon.
icon.
Tip:. Check out PathAway Tools - Icon Manager for creating your own icons.
Creating Routes
To create a new route go to the Options - Route dialog and select New. You will be presented with a dialog for naming the route, and setting the mode of transportation. Select your vehicle for the route. For this tutorial, select the Boat icon.
 To
add points to your route, select the Edit Points button. This brings
up an empty list of points. Choose Add... Select Footes Bay
Marina as your starting point. Press OK. Select Add... again. Select
Rosseau and OK. Now you have a basic Point A to B route. Lets go
with it and press OK until you get back to the map screen.
To
add points to your route, select the Edit Points button. This brings
up an empty list of points. Choose Add... Select Footes Bay
Marina as your starting point. Press OK. Select Add... again. Select
Rosseau and OK. Now you have a basic Point A to B route. Lets go
with it and press OK until you get back to the map screen.
On your map you should have one red straight red line heading from Footes Bay to Rosseau. But you're not flying there, so you'll have to choose to alter the route. Pick a point along the water, and tap on the map. Choose the Add to Route button. Press OK from the Edit Point dialog to accept the point. The point will be added to the route, and the route line is altered to reflect the change. PathAway will insert the new point between the two closest points along the route.
Note: Alternatively, you can choose to navigate to just a single point by selecting the point on the map and choosing Add to Route > New Route... from the Popup menus. Choose the option to Navigate to selected point from the New Route dialog.
Connecting a GPS
Now that you've got the basics, its time to get on your PathAway. PathAway works best with a GPS (Global Positioning System) device. Most GPS devices transmit location information through a serial cable attached to the PDA. Other units attach directly to the device. See the support page for a listing of compatible GPS devices and accessories.
 To
setup your GPS device for use in PathAway, select the menu GPS-Configure.
Choose your GPS device protocol from the list. Most GPS devices use
NMEA standard protocol. If your model is not specifically listed in the
list box, then NMEA will most likely work.
To
setup your GPS device for use in PathAway, select the menu GPS-Configure.
Choose your GPS device protocol from the list. Most GPS devices use
NMEA standard protocol. If your model is not specifically listed in the
list box, then NMEA will most likely work.
Select how you are connected to the GPS. If you attach via cable, choose Cradle. If your device works through the device infrared port, choose Infrared. Ensure your GPS device is setup to communicate and match up the baud, parity, bits, and stop bits settings. Most (if not all) GPS devices use Parity=N, Bits=8, Stop=1. 4800 is the most common baud rate.
Attach and turn on your GPS unit. Ensure you can get a signal. Most GPS units require a direct line of sight to the satellites. Press the Connect button to test the GPS. You should see the data stream messages flowing from the unit. Once your position is fixed, the longitude, latitude, elevation, and UTC (Universal Time Clock) are displayed.
Press OK to exit the dialog. Congratulations, you're now ready to navigate
with PathAway. Press the satellite  icon to connect and
disconnect from the GPS.
icon to connect and
disconnect from the GPS.
Tip. You can also connect and disconnect the GPS by pressing
the Memo hard key.![]() When you first connect, the New Trip dialog will appear. To accept the
defaults (Follow last route, and record a new track), press the Memo hard
key again to begin tracking with GPS.
When you first connect, the New Trip dialog will appear. To accept the
defaults (Follow last route, and record a new track), press the Memo hard
key again to begin tracking with GPS.
Navigating with a GPS
Now that you're connected to the GPS, you can begin to travel. At this point you should have acquired your own maps and installed them into PathAway using PathAway Tools - Map Manager. You can acquire maps from online web mapping sites, or you can scan your own from paper maps, use digital pictures, or get maps from CD-ROM.
Note: In order to use maps with a GPS, you need to calibrate them to their proper geographic (longitude/latitude) coordinates. This can be done in map manger by specifying the top-left and bottom-right coordinates of the map, or in PathAway using positions of known points. Refer to Calibrating Maps for more information.
Once calibrated, PathAway will center the map to your current location. As you move, the map is re-centered to show your position. If you are recording your track, you'll see a blue (or dark gray) line showing your line of travel.
Recording Tracks
You can record tracks for later use, or to see where you've been. This is especially helpful in case you start going in circles!
![]() Tracking
databases can get quite large, especially if you are capturing constantly.
This can slow screen refreshing down and consume a large amount of memory.
The Preferences section under Tracks, has some options for controlling
track database size, and recording precision. A good detailed track for
traveling between 30 and 60 mph is to set the precision to record position
every 10 seconds. To keep individual track database sizes down, you can
select the menu option End Trip. This will save the track, and
start a new one. Screen refreshes will only draw the current recorded
track.
Tracking
databases can get quite large, especially if you are capturing constantly.
This can slow screen refreshing down and consume a large amount of memory.
The Preferences section under Tracks, has some options for controlling
track database size, and recording precision. A good detailed track for
traveling between 30 and 60 mph is to set the precision to record position
every 10 seconds. To keep individual track database sizes down, you can
select the menu option End Trip. This will save the track, and
start a new one. Screen refreshes will only draw the current recorded
track.
Alternatively, you can set the tracking to record at certain distances. This will create a track record when you reach a certain distance. Therefore all track points will be of equal distance apart, regardless of your speed.
Following Recorded Tracks
Once you're recorded a journey, you can now use the track to follow. This is an extremely useful feature for finding your way home.
 To
choose a track to follow, select the Options-Tracks menu. The tracks
are automatically named using the date and time they are created. You
can change the name for your track and indicate the method of transportation
by pressing the Details button. Select the track you've just recorded.
Press Follow reverse. This will set activate the track to be followed
in the reverse order it was recorded in. You will see the red route line
on the map. You can now use this track in the same way you would a route.
To
choose a track to follow, select the Options-Tracks menu. The tracks
are automatically named using the date and time they are created. You
can change the name for your track and indicate the method of transportation
by pressing the Details button. Select the track you've just recorded.
Press Follow reverse. This will set activate the track to be followed
in the reverse order it was recorded in. You will see the red route line
on the map. You can now use this track in the same way you would a route.
You can get additional information when following a recorded track. To get the recorded track time as your ETA data, go to the Options-Preference menu, and select the Time section. Under the heading Time estimates based on, turn the check box on entitled Recorded Track Speed. You'll see your time remaining in the Route view screen. This is the actual time it took you when you recorded the track. This includes any stops along the way.
Terminology
Map Data
A database containing a map. The Map Manager is used to create maps for PathAway. The current version runs under Windows 95,98,2000 or higher. Original maps can be in Jpeg, or BMP format. You can create your own maps in a Paint program, or acquire the maps through scanning, CD-ROM,� or download from the Internet. You must ensure you do not violate copyright rules applied for the maps acquired. In the Map Manager you can enter the Long/Lat coordinates for the top-left and bottom right corners of the map, as well as the color depth. Gray shade, 16 color, 256 color, or 64 million colors (depending on capabilities of your device). Maps can be as large as the user desires providing there is enough memory on the Palm Powered™ device. Maps should be in longitude and latitude format. Meaning the actual curvature of the map is stretched onto a flat surface and all longitude and latitude lines are straight.
Dashboard
Customizable Border around navigation map screens. Contains useful travel statistics and information. Dashboard items can be modified by tapping on a particular item, and selecting a new data item from the popup menu. See Dashboard-Context Menu.
GPS
Global Positioning System uses a series of satellites to transmit data to receivers enabling them to accurately pinpoint their location and elevation on earth. Originally developed by the U.S. Department of Defense as a military system, GPS has become a global utility. It benefits users around the world in many different applications, including air, road, marine, and rail navigation, telecommunications, emergency response, oil exploration, mining, and many more.
PathAway utilizes connections to GPS devices to provide accurate positioning data.
Routes
Routes can be created by linking points together in a sequence. When following a route, the distance to next point, and time and distance to destination are displayed. Also, the distance and direction off of the route is shown.
Travel/Transportation Mode
Define your mode of transportation, for easy searching for routes and tracks. Time Estimates can be made by the default vehicle speed or a custom speed you choose. Vehicles are currently defined PC-side.
Tracks
Tracks can be created by recording GPS movement. These tracks can then be �Followed� to perform as an accurate guide for the travel.
Icons
Icons in PathAway can be created and modified by using the PathAway Tools - Icon Manager. Original Icons can be created from a paint program in Jpeg or BMP format and imported into your Icon database. These icons can then be used in PathAway to mark Points.
Points
Points are locations marked by the user. Each point can be identified by a name, icon, and description. The icon you choose for your point, will be displayed on the map. In PathAway, points are stored in the Points database. You make create multiple points databases to store points. To Create and Edit these databases, go to the Points Dialog, and select Options-Edit Databases.
Proximity
While traveling, PathAway will display the points on the map that are in close proximity. If following a track, the distance to the closest point on the track, and the distance to the end of the track are displayed.
Simulate
Simulates a route by moving the map to points along the route in sequence until the end of the route. Use the simulate to verify routes you've created, or to review tracks after they've been recorded.
Reference
Navigation Views
The main screens of the program are the navigation screens used for displaying maps, and other travel and location information. The screens are all composed of a map viewing area surrounded by a customizable dashboard. The dashboard can also be completely removed from the view in the "View" menu. There are 5 different screens available for targeted use.. They are shown as follows:
Full
Screen Map View
Utilizes most of the screen to show as large a map area as possible. Long/Lat,
speed, elevation, and direction of travel are displayed. This data is
the �navigation� data in the program.
![]() Tracking
View
Tracking
View
Shows the map and navigation data. Default travel stats are trip
time and distance, current, average, and maximum speed.
Proximity
View
Shows the map and �navigation� data, plus full info for point and
route proximity. Time and distance to destination, and next point on track
are shown. Position off or on track is also displayed.
Route
ViewShows the map and �navigation� data, plus full info for point proximity. As you approach a point, distance from and course to are displayed. Points in proximity are displayed by closest point.
Point View
Shows the map and �navigation� data, plus access to the point/route
and track databases. Useful for selecting items from the databases and
displaying them on the map or placing them into a route. Details such
as Position, Proximity, Elevation, Time, Leg Time, Leg Distance, and Leg
Speed can also be displayed.
Tip. You can also traverse through the screens by pressing
the Phone Book hard key.![]()
Navigating without Maps
PathAway works with or without maps. When used without maps, PathAway will display all points in a virtual Longitude and Latitude world. You can Zoom In and out to increase and decrease the Scale factor of your view. If you have points, routes, or Tracks defined, PathAway will display them on the screens. GPS connectivity works well with or without maps.
Navigating with Maps
When navigating with maps, PathAway will center the map on your current location. When not connected to GPS, you can scroll the map to view different portions in the following 2 ways:
- Tapping and holding on the edges of the map will scroll the map in the direction towards the stylus. The map will continue to scroll until the stylus is released.
- Tapping and dragging will scroll the map in the direction you move the stylus.
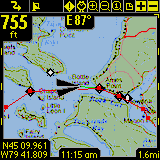
Navigating with a GPS Device
PathAway supports any NMEA0183 v2.0 or higher compatible GPS device. This encompasses the majority of GPS devices on the market. Delorme Earthmate�, and Tripmate� proprietary protocols are also supported. A GPS is not required to use the software. A GPS device can be cable or infrared. Special serial cable can be purchased from GPS device manufacturer. Palm Powered™ device serial cable adapter can also be purchased separately.� Some devices may come with the required cables for connecting to your Palm.
Current location on map is shown by the cross-hairs in the center of the map window or with an arrow showing� direction of travel. When connected to a GPS , direction is shown by course required to reach the next point on route.
To navigate with your own maps, you need to convert and install them into PathAway using PathAway Tools - Map Manager. You can acquire maps from online web mapping sites, or scan them from paper maps, use digital pictures, or get maps from CD-ROM.
In order to use maps with a GPS, you need to calibrate them to their proper geographic (longitude/latitude) coordinates. This can be done in Map Manger by specifying the top-left and bottom-right coordinates of the map, or in PathAway using positions of known points. Refer to Calibrating Maps for more information.
Once calibrated, PathAway will center the map to your current location. As you move, the map is re-centered to show your position. If you are recording your track, you'll see a blue (or dark gray) line showing your line of travel on the map.
Navigation Menus
The following menus are available from all Navigation screens.
GPS Menu |
||
|
|
|
|
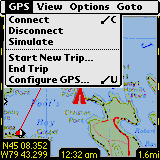
| Connect/Disconnect | Controls connection to GPS device. | |
| Simulate | Simulates a route by animating travel along the points of the route. | |
| Start New Trip... | Start a new trip. Options to start with a new track log, or continue current, and choose a new route to follow. | |
| End Trip | Clear the track log, reset odometer. Next connection will start with a new track log. | |
| Configure GPS... | Setup for GPS device. Choose device type. Confirm communications. | |
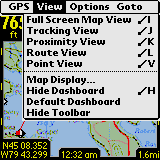
View Menu |
||
|
|
|
|
| Full Screen Map View | Shows Full Screen map view. | |
| Tracking View | Shows Tracking view. | |
| Proximity View | Shows Proximity view. | |
| Route View | Shows Route View. | |
| Point View | Shows Point View. | |
| Map Display... | Show options for Map Display. | |
| Show/Hide Dashboard | Turn Dashboard On/Off. | |
| Default Dashboard | Restores original Dashboard for current screen. | |
| Show/Hide Toolbar | Turn Top toolbar on/off | |
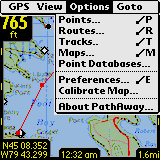
Options Menu |
||
|
|
|
|
| Points... | Management of Points. Shows list of points. Options to Create new points, delete, edit individual points, Sort, find, and go to selected points on map. Beam points to others. | |
| Routes... | Management of Routes. Shows list of routes. Options to Create new routes, rename, delete, edit route points, duplicate, join 2 routes together. Beam route to others. Select a route to display on the map. | |
| Tracks... | Management of Tracks. Shows list of recorded tracks. Options to rename, delete, edit track points, duplicate, join 2 tracks together. Beam tracks to others. Select a track to display on the map. | |
| Point Databases... | Management of Points databases. You can store points in multiple databases and show/hide databases. | |
| Maps... | Management of Maps. Shows list of maps. Options to edit map location details, Display map, delete maps, beam maps to others. | |
| Preferences... | Settings for options such as units of display, track recording options, map display options, time estimation settings, alarm settings, and GPS configuration. | |
| Calibrate Map... | Adjust map location coordinates by selecting 2 known points on the map. Map location is adjusted by distances between the two points, by nudge controls, or by setting the top-left and bottom right longitude and latitude coordinates. | |
| About PathAway... | Information about PathAway. Registration key entry. | |
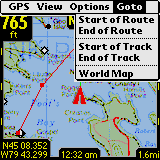
Goto Menu |
||
|
|
|
|
| Go to Start/End of Route | Moves location to the start or end of the active route. | |
| Go to Start/End of Track | Moves location to the start or end of the active recorded track. | |
| World Map | Display built-in world map. | |
Context Sensitive Popup Menus
Tapping on PathAway screen brings up a context menu depending on the item selected. Tapping on the map brings up the Map Context menu. Tapping on a dashboard item brings up the Dashboard menu options.
 Map
Popup Menus
Map
Popup Menus
Tapping on the map brings up a context sensitive menu. Tapping on an existing point will display the current location coordinates, the closest point name, and a menu of options.
The following menus are activated when the map is tapped on, based on the condition. The menus are organized into multiple layers for easy navigation. The first menu is the Top Level.
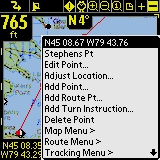
Map Popup Menu - Top Level
| Name | Description | Action |
| <Current Location> | Displays the geographic coodinates of the selected location | Displays a screen showing detailed information about the location, such as distance to, ETA to, etc. |
| <Closest Point> | Displays the name of the closest point, if any | Displays a screen showing detailed information about the point, such as distance to, ETA to, etc. |
| Edit... | Displays the Point Edit dialog for the selected point. | Shown when a Point is selected. |
| Add Point | Adds the selected location to the Points database. Calls up Edit Point dialog for naming and selecting icon. | Shown when no point selected. |
| Add Route Pt | Adds selected location to the route. | Shown when there is an Active Route, and location not on route. |
| Add Turn Instruction... | Adds the selected location to the route and flags it
as a Turn point. Note the "Intersection" icon is the indicator of a Turn. |
Shown when there is an Active Route, and location not on route. |
| Adjust Location | Allows adjusting the location of the selected point by tapping it's proper position on the map. | Shown when a Point is selected. |
| Delete Point | Deletes the selected point from the Points database. | Shown when a Point is selected. |
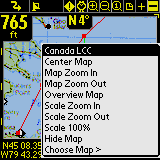
Map Popup Menu - Map Menu >
| Name | Description | Action |
| <Closest Map> | Displays the name of the current map, if any | none |
| Center Map | Centers map at selected location. | For all Taps. |
| Map Zoom In | Zooms into the next map under the selected location. | For all Taps. |
| Map Zoom Out | Center map and Zoom out to the wider area map. | For all Taps. |
| Overview Map | Displays the overview map. | |
| Scale Zoom In | Expands the pixels of the current map to show a close up view of the area. | |
| Scale Zoom Out | Shrinks the pixels of the current map to show a wider view of the area. | |
| Scale 100% | Draws the map in its original scale. | |
| Show/Hide Map | Remove the map from the screen or show the current map if it has been hidden | |
| Choose Map > | Go to the Maps dialog to choose other maps not withing the bounds of the selected area. Same as selecting the main menu Options - Maps... | |
Map Popup Menu - Choose Map Menu >
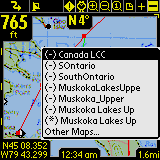
| Name | Description | Action |
| (+) <Map Name> | Name of Map available to Zoom Into | |
| (-) <Map Name> | Name of Map available to Zoom out to | |
| Other Maps... | Displays the Maps dialog. | |
Map Popup Menu - Route Menu >
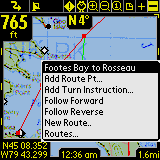
| Name | Description | Action |
| <Route Name> | Displays the name of the current route, if any | |
| Edit... | Displays the Point Edit dialog for the selected route point. | Route Point selected. |
| Add Route Pt | Adds selected location to the route. | Shown when there is an Active Route, and location not on route. |
| Add Turn Instruction... | Adds the selected location to the route and flags it
as a Turn point. Note the "Intersection" icon is the indicator of a Turn. |
Shown when there is an Active Route, and location not on route. |
| Delete fm Route | Removes the specific point selected from the active route. Point remains in point database if there already. | Route Point selected. |
| Follow Forward | Activate the selected Route to follow from the start. | |
| Follow Reverse | Activate the selected Route to follow in reverse order starting at end point of the route | |
| New Route | Create a new route | Brings up the New Route dialog |
| Routes | Go to the Routes dialog to choose other Routes. Same as selecting the main menu Options - Routes... | |
Map Popup Menu - Other Points Menu >
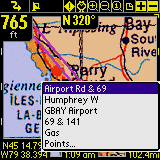
| Name | Description | Action |
| <Points List> | Displays a list of points found in the the geographic coodinates of the selected location | Displays a screen showing detailed information about the location, such as distance to, ETA to, etc. |
| <Closest Point> | Displays the name of the closest point, if any | Displays a screen showing detailed information about the point, such as distance to, ETA to, etc. |
| Add Point | Adds the selected location to the Points database. Calls up Edit Point dialog for naming and selecting icon. | No point selected. |
| Add Route Pt | Adds selected location to the route. | Shown when there is an Active Route, and location not on route. |
| Add Turn Instruction... | Adds the selected location to the route and flags it
as a Turn point. Note the "Intersection" icon is the indicator of a Turn. |
Shown when there is an Active Route, and location not on route. |
| Edit... | Displays the Point Edit dialog for the selected point. | Point selected. |
| Adjust Location | Allows adjusting the location of the selected point by tapping it's proper position on the map. | Point selected. |
| Delete Point | Deletes the selected point from the Points database. | Point selected. |
| Points... | Go to the Points dialog to choose other Routes. Same as selecting the main menu Options - Points... | |
Map Popup Menu - Tracking Menu >
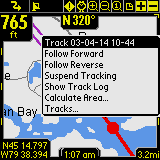
| Name | Description | Action |
| <Current Track Log> | Displays the name of the current track log. | |
| Follow Forward | Activate the selected Route to follow from the start. | |
| Follow Reverse | Activate the selected Route to follow in reverse order starting at end point of the route | |
| Suspend/Resume Tracking | Suspends or Resumes recording positions to the current track log. | |
| Show/Hide Track Log | Shows or hides the current track log on the map | |
| Tracks... | Go to the Tracks dialog to choose other Tracks. Same as selecting the main menu Options - Tracks... | |
Dashboard Context Menus
12 Customizable Dashboard Options allow you to see the information you are most interested in.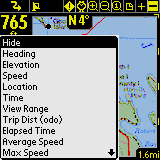 |
 |
 |
| Name | Description |
| Hide | Removes the currently selected info from the selected Dashboard. |
| Heading |
Shows current Heading (course) direction. |
| Elevation |
Shows current Elevation. |
| Speed |
Shows current rate of speed. |
| Location |
Shows current longitude/latitude position. |
| Time |
Current Time. Palm OS™ Time when not connected to GPS. GPS UTC + time zone offset when connected to GPS. |
| View Range |
Map View range distance. Horizontal distance from left to right side of screen. |
| Trip Dist (odo) |
Distance traveled since start of Trip (first GPS fix). |
| Elapsed Time |
Elapsed time in minutes since start of Trip (first GPS fix). |
| Average Speed |
Average speed since start of trip. |
| Max Speed |
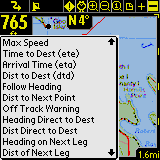
Maximum speed obtained. |
| Time to Dest (ete) |
Estimated amount of time to reach destination. Available only if following a Route. |
| Arrival Time (eta) |
Estimated time of Arrival at destination. Available only if following a Route. |
| Dist to Dest (dtd) |
Distance to destination along route. Available only if following a Route. |
| Follow Heading |
Follow this course to reach next leg point. Available only if following a Route. |
| Dist to Next Point |
Distance to next leg. Available only if following a Route. |
| Off Track Warning |
Displays distance and position off the route track. Available only if following a Route. |
| Heading Direct to Dest |
Displays the heading direct to the route destination point. Available only if following a Route. |
| Dist Direct to Dest |
Displays the straight line distance direct to the route destination point. Available only if following a Route. |
| Heading on Next Leg |
Heading to follow after next point in route is reached. Available only if following a Route. |
| Dist of Next Leg |
Distance to next point after next point. Available only if following a Route. |
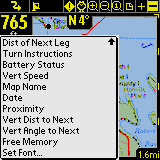
| Turn Instructions |
Display Right-Left turn instructions. Activates when next point is defined as an Intersection. Available only if following a Route. |
| Battery Status | Battery charge status expressed as a percentage %. |
| Vert Speed | Displays the vertical rate of climb or descent. |
| Map Name | Displays the current map name |
| Date | Displays the current date |
| Proximity | Displays the proximity information to the closest point. |
| Vert Dist to Next | Displays the vertical distance in elevation units to the next pont on the route. |
| Ver Angle to Next | Displays the vertical angle to the next point as expressed in degrees |
| Free Memory | Displays the amount of available memory. |
| Set Font... | Set the primary font for the currently selected item. |
Customizing Screens
All of the screens contain a customizable dashboard. Each screen has a dashboard setup associated with it. Here is how to customize the dashboard.
To Hide the Dashboard, choose the main menu select View, then
Hide Dashboard. The screen will look similar to the this:
Hide the Dashboard for large screen map viewing
Choose the View menu option Show Dashboard to turn the dashboard back on.
You can also utilize the entire full view of the screen by turning the Top Toolbar off by selecting the View menu and choosing Hide Toolbar.
To
adjust individual dashboard items, simply tap the item you would like
to customize. The Dashboard Options menu will
appear showing the currently selected item and the options to available
to set for the dashboard.
When there is no active information available for a dashboard control item, or the dashboard item is hidden, only a bar will be displayed. Clicking on one of the bars will bring up the dashboard menu.
Toolbar:
| Main Menu Bar. Turns to hourglass when drawing screen. | |
| Connect/Disconnect GPS. When connected to GPS, turns to a Lock icon when a GPS fix is obtained. Vertical bars shows # of satellites fixed on. Short dots indicate # of satellites in view. | |
 |
Add Point at location. |
 |
Toggle proximity alarm on/off. |
| Zoom into current map by expanding the map | |
| Zoom Out of the current map by shrinking the map. | |
| Restore Map scaling to 100% or Actual size | |
| Show full map view. | |
 |
Zoom Out - no Map. |
| Zoom In - no Map. | |
| Zoom Out - to another Map. | |
| Zoom In - to another Map. |
Please note, moving between stacked maps should not be confused with map scaling where you zoom into or out of a single map by expanding or shrinking the map. PathAway does not scale maps at this time. (Memory and performance limitations on the Palm OS™ prohibit reasonable performance for map scaling at this time.)
|
Add |
Cycle Screen Views |
Zoom |
Databases |
Connect/ Disconnect GPS |
|
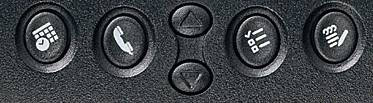 |
|||||
Note some hard keys can also be used to press OK from a dialog.
New Trip Dialog OK key = Connect GPS hard key.
Edit Point OK key = Add Point button.
Dialogs
GPS Menu
Options from the GPS menu bar.
 Start
New Trip...
Start
New Trip...
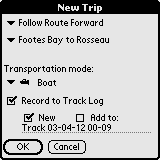
For selecting route and track recording log befre beginning a trip.Follow Track Forward or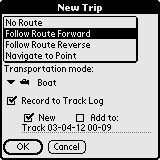
Follow Track Reverse
Select the route to follow from the list of previously created routes
and recorded tracks.
Navigate to Point
Select a single point to navigate to. Selecting this option will bring
up the Point Selection Dialog. Here you select the point to navigate
to. Single Point navigation differs from Route database navigation in
that only a single point is routed to. The Route line will appear on the
map directing you to straight to this point.
Transportation Mode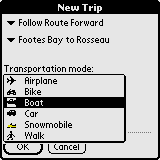
Select the transportation mode type. This enables
you to easily identify trips of common type
Record to Track Log:
Turn on or off track recording. Choose to create a new track log, or to
add to the current track database. If you choose new track, then all travel
stats will be reset. I.e.. Odometer, travel time etc.
Tip: This dialog is launched when you first connect to the
GPS. If you've connected using the Memo hard key,![]() you can quickly accept the defaults (Follow last route, and record a new
track), by pressing the Memo hard key again to begin tracking with
GPS.
you can quickly accept the defaults (Follow last route, and record a new
track), by pressing the Memo hard key again to begin tracking with
GPS.
GPS
Configure
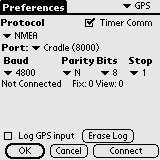
Setup for GPS device. Watch GPS input stream to ensure communications is
working properly.This is the method that your GPS device uses for communicating with other devices. Choose your type of GPS device, or specify it's communications protocol.
NMEA is the most common protocol for serial communications in use today. NMEA stands for National Marine Electronics Association. PathAway supports version 2.0 or higher of NMEA-0183. Check your device for specifications on interfacing with other devices. Some devices have multiple interfaces that can be set. Ensure that NMEA-0183 is set as the active communications interface.
Port:
Choose the port your GPS is connected to. Most common is cradle port.
This is the same port you use when HotSync is selected.
Baud Rate:
The Baud rate is the speed in, bits per second, which data is transferred
from the GPS device. Some devices have a fixed baud rate, others can be
selected on the GPS device itself. Ensure that your baud rate on your
GPS matches the selected baud rate here. Check your GPS device manual
for information on proper baud rate settings.
The most common baud rate for most GPS devices is 4800 BPS. Next is 9600, followed by 57,600.
Parity, Bits, Stop bits:
Serial communications settings. Most devices use N,8,1. Check your GPS
manual for proper settings.
Log GPS input:
Used for debugging GPS communications. Checking this flag will record
the GPS communications stream to a log file called PathAwayLog.pdb. When
you HotSync, the file is transferred to your Palm Backup folder. You may
be asked to send this log to PathAway customer support if you have problems
connecting to your GPS.
Note: If your Palm User name is "Charlie Patterson" and your Palm folder is in C:\Palm, your Backup folder can be found at "C:\Palm\PatterC\Backup".
Timer Comm:
PathAway 3 implements Interrupt-Based communications to make the program
more responsive to user input while connected. This method is preferable
if it works for the GPS device. If you have been encountering difficulties
with GPS connectivity, you can set PathAway to use the "Timer-Based
Communications" as in Version 2. To set "Timer-Based Communications":
turn ON the setting for "Timer Comm". This will set the program to communicate
on a timer rather than the new Interrupt based communications.
Connect:
Begins communicating with GPS device. If communications are working properly,
you should see a stream of GPS information on the screen. When a "FIX"
of your current position has been determined, then the current longitude
and latitude position will be displayed, along with type of fix, number
of satellites used for the fix, and total number of satellites in view.
View Menu Dialogs
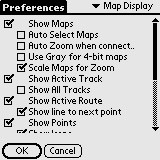
Map Display Options
Control what layers are displayed on the maps.
 |
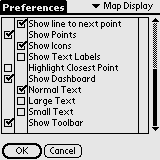 |
Show Maps:
Display maps on the navigation screen. When not selected, navigation can
be done by the virtual map, which will still place your recorded points
on the screen based on the current zoom factor.
Auto Select Maps:
When Show Maps is selected, this option will automatically switch
maps, when the position is no longer over the current map. When this option
is checked, the zoom to No Map feature is not available if there is at
least one map at the current location.
Auto Zoom when connected:
With this option on, the map of the highest
detail will automatically be chosen while connected to the GPS.
User Gray for 4-bit maps:
For color devices only. If you have created or acquired 16 color (4-bit)
maps, they can be displayed in either 16 colors, or gray scale.
Show Tracks:
Show the currently active track log line. For color devices, the log
is shown in blue. For gray-scale devices, the track log is gray and identifiable
by the points that connect the lines.
Show All Tracks:
Display all the available tracks on the device. This feature may cause
the screen to draw quite slowly, depending on the number of tracks in
memory. This feature is useful to see all the tracks you've traveled on.
To select a track to follow, tap on one of the track points and select
Follow Forward, or Follow Reverse.
Show Points:
Show the recorded point icons and/or labels on the map screen.
Show Icons:
Show the point icons. When you zoom out you can specify the threshold
when the icons are not to be displayed. This is useful to avoid screen
clutter when viewing wide areas.
Show Text Labels:
Show the point text labels. When you zoom out you can specify the
threshold when the text is not to be displayed. This is useful to avoid
screen clutter when viewing wide areas.
Highlight Closest Point:
Show label, distance to, and pointer to the closest point in proximity.
Show Dashboard:
Show or hide the Dashboard
Normal/Small/Large Text:
Global setting to show text in different sizes. When large text is
selected, each font on the dashboard is expanded by one size. When small
text is selected, each font is reduced by one size.
Show Toolbar
Show or hide the top toolbar on the main screens
Options Menu Dialogs
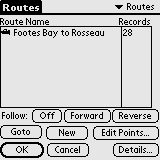
Options-Routes
Route management dialog. Lists all of your routes. You can create new routes, edit a route, or choose an existing route to follow forward or reverse. The current Route you are following is indicated in the rightmost column by an 'f' for forward, or 'r' for reverse.
 |
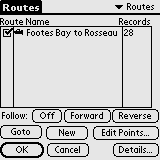 |
Select Route to follow by highlighting a route in the list. If the Map Display Preferences are set to "Show All Tracks", then a check-box will appear beside each route. Turn the check-box on to always display the route on the map. Turn the check-box OFF to hide the route from the display
New:
Create a new route. Will launch the Route Database Info Dialog.
Edit Points...
Add or Edit Route Points. Launches the Point
Record Management dialog.
Details...
For modifying the details of the route, such as name, transportation mode,
and individual points. Launches the Route Database Info Dialog.
Follow Off
Clears the Follow flag on the selected route.
Follow Forward
Activate the selected Route to follow from the start. As you travel, your
current position along the route will be displayed. Information such as
ETA, Dist to Next point, Distance to destination etc. can be displayed.
Follow Reverse
Activate the selected Route to follow in reverse order starting at end
point of the route
Goto
Reposition the map to the start of the selected route
Routes Dialog Menus
| Name | Description |
| Database Menu | |
| New | Creates a new route. |
| Edit Points... | Edit track records in the Points Record Dialog. |
| Duplicate... | Duplicates the selected track. |
| Join |
Select the a route database, select the Join menu command. It will go back to the Route database screen. Then you select the route you want to append to the previously selected one. Press OK. The Join will be performed. |
| Delete | Deletes the selected route. |
| Beam... | Beam route database to another Palm device. |
| Move To... | Move route database to and from expansion card. |
| Send to GPS... | Send route to Garmin GPS device. |
| Get from GPS... | Download route directly from a Garmin GPS device. |
| Options Menu | |
|
Unsorted |
No sorting. |
| Sort by Name | Sorts by name. |
| Sort by Date | Sorts by creation date. |
| Sort by Transportation Mode | Sorts by selected transportation mode name. |
| Sort by Location | Sorts in order of closest proximity to current location. |
| Preferences | Launches Track preferences dialog. |
Route Details (Database Info)
For modifying the details of the route, such as name, transportation
mode, and individual points.
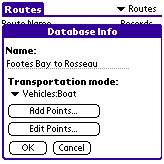 |
Name:
Name of Route.
Add Points...
Add points to route. Launches the Point Record Editor.
Route points can also be added from the map view by selecting a point on the map and selecting "Add to Route" from the menu.
Edit Points...
Modify the points in the route. Add new points, delete points, or
change order. Launches the Point Record
Management dialog.
Mode of Transportation:
Select the transportation mode from the list. Icons can be created using PathAway Icon Manager.
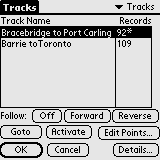
Options-Tracks
Lists of your recorded tracks. Choose a track to follow for pinpoint accurate routing.
|
 |
Manage your tracks by duplicating or joining tracks, and transfer between Garmin GPS devices.
Follow:
Selects the track as a route. Can follow tracks in the order they were
recorded forward or in reverse order. An 'f' for forward or 'r' for reverse
is displayed on the track list indicating the track currently selected
to follow.
Activate
Sets the selected track as the active track log. The track is Displayed
on the current navigation screen. All subsequent position recording added
to this track.
Goto
Repositions the location to the start of the currently selected track.
The track will not be displayed unless it is the Active track, or is checked
to show.
Edit Points...
Edit track points in the Points Record
Dialog.
OK, Cancel
Returns to the current navigation screen.
Details...
Allows editing of the track name, mode of transportation.
Tracks Dialog Menus
| Name | Description |
| New | Creates a new track. |
| Edit Points... | Edit Track points. Brings up Database Record Edit Screen. |
| Duplicate... | Duplicates the selected track |
| Join |
Select the a tracking database, Select the Join menu command. It will go back to the Track database screen. Then select the track to append to the previously selected one. Press OK. The Join will be performed. |
| Delete | Deletes the selected track |
| Beam... | Beam entire track database to another Palm device. |
| Move To... | Move database to and from expansion card. |
| Send to GPS... | Send track to Garmin GPS device. |
| Get from GPS... | Download track directly from a Garmin GPS device. |
| Options Menu | |
|
Unsorted |
No sorting |
| Sort by Name | Sorts by name |
| Sort by Date | Sorts by creation date |
| Sort by Transportation Mode | Sorts by selected transportation mode name. |
| Sort by Location | Sorts in order of closest proximity to current location |
| Preferences | Launches Track preferences dialog |
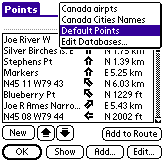
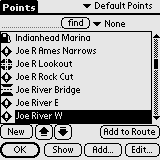
Options-Points
Lists all points. Points may be stored in multiple databases. Select a point to "Goto" on the map, edit point information, delete, add new points.
 |
Point Databases Drop-down List
Select the point database to edit. Choose Edit
Databases to add, or modify entire Point databases.
Find
Searches for the next occurrence of the entered point name.
New:
Create a new point. Will launch the Point Edit
Dialog.
Up - Down Arrows
Moves the selected point up or down in the list.
Add to Route
Adds the selected point to the active route.
Close
Closes the current dialog and returns to the previous dialog.
Show
Shows the selected point on the navigation screen.
Add...
Add points to current database from another point databases. A new
list is displayed. Choose the point to add and press OK.
Edit...
For modifying the details of the selected point, such as name, geographical
coordinates, description, and icon. Launches the Point
Edit Dialog.
Points Dialog Menus
| Name | Description |
| Point | |
| New... | Creates a new point. |
| Edit Points... | Modify selected point details |
| Delete | Deletes the selected point. |
| Beam... | Beam entire point to another Palm device. |
| Move To... | Move entire point database to and from expansion card. |
| Send to GPS... | Send selected point or entire point database to Garmin GPS device. |
| Get from GPS... | Download points directly from a Garmin GPS device. |
| Options | |
| New Database... | Create a new Points database |
| Edit Databases... | Edit point database list |
| Add from other Database... | Add points from other database to current database. |
| Split Database | Split database at current record. |
|
Sort by Name |
Sort by point name |
| Sort by Proximity | Sort points in order of closest location to current location |
| Sort by Icon | Sort by selected point icon name. |
| Database Details | Edit Database name and details. |
| Preferences | Launch Preferences... |
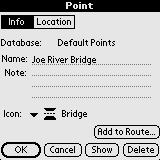
Point Details
Edit point name, geographic location, description, and choose an icon to represent the point on the map. This dialog is deivided into sections: Info and Location. the point Info section is for specifiying information on the description of the point. The Location section holds the actual geographic location data for the point.
 |
|
 |
Info Section
Name:
Name for the point. Maximum length is 79 characters. All characters
except (commas and quotes) are valid.
Note:
Describe the point. Maximum length is 4000 characters.
Point Icon Drop-down list:
Apply your own custom made icons to your points.
See Icon Manager for details on how to import your own points.
Show on Map:
Center the map on the current point.
Add to Route:
Add point to current route.
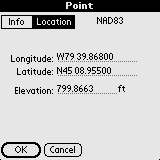
Location Section
Longitude/Latitude:
Geographical coordinates for the point. See Entering
Longitude/Latitude coordinates for specifying the top-left and bottom
right coordinates of the map.
Elevation:
Altitude above sea level for the point.
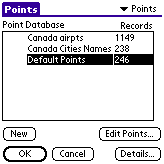
Options-Points-Edit Databases
Lists of your points databases, Choose a point database to make the active database for which new points will be added to.
 |
Manage point databases by duplicating or joining databases, move to and from expansion cards, beam to others, and transfer between Garmin GPS devices.
New
Create a new Point database.
Edit Points...
Edit points in the Points Record Dialog.
OK, Cancel
Returns to the current navigation screen.
Details...
Allows editing of the point name.
Point Database Dialog Menus
| Name | Description |
| New | Creates a new point database. |
| Edit Points... | Edit points in the Points Record Dialog. |
| Duplicate... | Duplicates the selected database |
| Join... |
Select the a point database, Select the Join menu command. It will go back to the Point database screen. Then you select the database you want to append to the previously selected one. Press OK. The Join will be performed. |
| Delete | Deletes the selected point database. |
| Beam... | Beam entire point database to another Palm device. |
| Move To... | Move database to and from expansion card. |
| Send to GPS... | Send point database to Garmin GPS device. |
| Get from GPS... | Download points directly from a Garmin GPS device. |
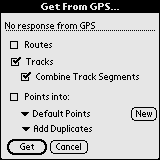 Options-Tracks/Routes/Points-Get
From GPS Device
Options-Tracks/Routes/Points-Get
From GPS Device
For acquiring data from Garmin GPS devices.
Routes:
Downloads all routes from GPS. Each route will be downloaded to a unique
route database.
Tracks:
Downloads recorded track logs from GPS. Garmin separates track logs into
segments. The tracks can be downloaded into a single track log containing
all track segments, or each segment can be placed in a separate database.
Points:
Downloads waypoints from GPS into selected Points database.
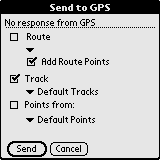 Options-Tracks/Routes/Points-Send
To GPS Device
Options-Tracks/Routes/Points-Send
To GPS Device
For sending data to handheld GPS devices. This operation is supported for only Garmin GPS devices in Garmin-Garmin Interface mode, and Magellan NMEA. Please ensure that your GPS device is on and connected before selecting this option.
Routes:
Sends selected route to GPS. All points in the route may be uploaded as
waypoints linking to the route.
Tracks:
Sends selected track to GPS as a track log.
Points:
Sends points from entire Points database, or only the currently selected
point. Points are stored as waypoints on the device.
Options-Maps
Lists all loaded maps. Choose display to show the map on-screen. Transfer maps between memory expansion cards.
Show
Displays currently selected map on the current navigation screen.
Cancel
Returns to the current navigation screen.
Delete
Deletes the current map.
Details...
Allows editing of the map details.
Map Dialog Menus
| Name | Description |
| Calibrate Map | Calibrate selected map to it's geographic coordinates. |
| Delete | Deletes the selected map. |
| Beam... |
Beam maps to another device. |
| Move To... | Move maps to and from expansion cards. |
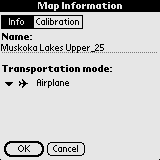
Map Details
Edit map information such as name, map type, and geographical coordinates, projection, and datum. The map details dialog is divided into sections, Info and Calibration. The Info section contains the information about the map. The Calibration section holds information on the map coordinates.
 Map
Details - Info
Map
Details - Info
Name
The name of the map
Transportation Mode
The travel type the map is intended for. Allows you to organize maps by
type. Ie. Aviation, boating, Hiking etc. Note, the transportation mode
data comes from the Vehicles.prc Icon database. You can create your own
types by editing this database in the Icon Manager.
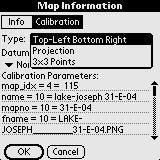
Map Details - Calibration
The Calibration of the map requires three major components:
- Type of Calibration
- Map Datum Information
- Map Geographic Coordinates relative to the pixel image of the map
 1.
Calibration Type
1.
Calibration Type
PathAway allows the map to be defined by 3 different types.
- Top-Left Bottom-Right.
- Projection
- 3x3 Point
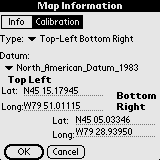 The
Top-Left Bottom-Right coordinate system is a simple rectangular
map shape. All longitude lines are perfectly vertical and all latitude
lines are perfectly horizontal. This type of map is acturate enough for
maps of small areas where the curvature of the earth is insignificant.
PathAway will also run much faster with this system since no complex math
is required to determine plot points on the map. To calibrate maps of
this type you need to know only the top-left and bottom-right longitude
and latitude coordinates of the map.
The
Top-Left Bottom-Right coordinate system is a simple rectangular
map shape. All longitude lines are perfectly vertical and all latitude
lines are perfectly horizontal. This type of map is acturate enough for
maps of small areas where the curvature of the earth is insignificant.
PathAway will also run much faster with this system since no complex math
is required to determine plot points on the map. To calibrate maps of
this type you need to know only the top-left and bottom-right longitude
and latitude coordinates of the map.
See Entering Longitude/Latitude coordinates for specifying the top- left and bottom-right coordinates of the map.
You can also calibrate the map right in PathAway using the locations of two or more known points. See the section on Calibrating Maps.
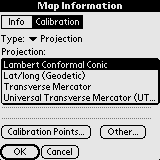 The
Projection type of map employs maps defined using specific named
projections such as Lambert Conformal Conic, UTM, and Transverse Mercator.
All projected maps require the library ProjLib.prc, and their approriate
projection library. (except Labert Conformal Conic, which is built into
ProjLib)
The
Projection type of map employs maps defined using specific named
projections such as Lambert Conformal Conic, UTM, and Transverse Mercator.
All projected maps require the library ProjLib.prc, and their approriate
projection library. (except Labert Conformal Conic, which is built into
ProjLib)
Refer to the Advanced Mapping Manual for more information on specific projections and how to set them up in PathAway.
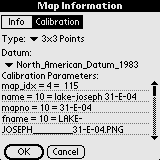 The
3x3 map type is a non-rectangular map type controlled by 9 coordinate
positions on the map. Currently these map types can only be generated
and calibrated using Touratech Desktop mapping software. See out section
on Touratech for more information
The
3x3 map type is a non-rectangular map type controlled by 9 coordinate
positions on the map. Currently these map types can only be generated
and calibrated using Touratech Desktop mapping software. See out section
on Touratech for more information
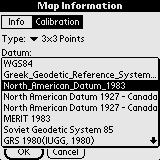 2.
Map Datum
2.
Map Datum
You can also specify the source map datum used by the defined map. This allows you to convert coordinated of different datums to display correctly on all maps. Refer to the Advanced Mapping Manual for more information on specific datums and how to set them up in PathAway.
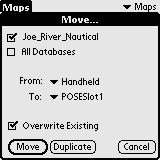 Move
To/From Expansion Cards
Move
To/From Expansion Cards
From the a track/route/point or map database dialog. Select the Move to... menu option.
Move or copy (Duplicate) databases to and from expansion card.
Checkbox - Current Database
Copy or move the currently selected database to. If the database is on
the expansion card, the Option is to move from the card to Handheld main
memory.
Checkbox - All Databases
Copy All Databases To and From expansion cards
Note: All databases on cards are stored in the \Palm\Launcher folder. PathAway will also look for databases in the \Palm\PathAway folder, but will not transfer data between this folder.
 Options-Calibrate
Map
Options-Calibrate
Map
Once maps have been transferred to the device, you can fine-tune the map coordinates by matching the positions of known points on the maps, with the actual position displayed by the map. Resolution, and offset of the map is adjusted. Or the map database can be edited and the top-eft - bottom-right coordinates of the map can be manually edited.
First you should select the map you are going to calibrate. If the map to calibrate is not visible, go to the Options-Maps dialog, and choose the map by it's name, and tap the Show button.
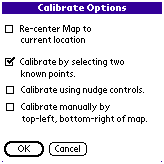
To calibrate the map, select the Options-Calibrate Map menu options. You will be shown a dialog with calibration options.
Calibrate by known points
The easiest way to calibrate a map is to simply choose two points where
their geographical location (longitude-latitude) is already known. These
may be points you've already captured using your GPS.
Calibrate using Nudge Controls
Nudge Map Calibration controls are for making small adjustments to
the maps. They work best when you have a map and have recorded tracks
with the GPS and or have marked a few points. If the track doesn't exactly
line up with a road, or points are not right on the place they should
be, you can use the nudge controls to "Line up" the maps with the known
points.
Calibrate Manually
Manual calibration means simply setting the top-left and bottom-right
geographical (longitude-latitude) coordinates of the map.
 Calibrate
by known points
Calibrate
by known points
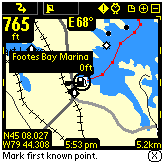
First you should select the map you are going to calibrate. If the map to calibrate is not visible, go to the Options-Maps dialog, and choose the map by it's name, and select Show. To choose a map. The screen will be changed to the Full Screen Map View. You are prompted to select the first point.
 Scroll
the map to a position of known coordinates. I.e. your home. Click on the
map the location where the point SHOULD be. This brings up the Points
list.
Scroll
the map to a position of known coordinates. I.e. your home. Click on the
map the location where the point SHOULD be. This brings up the Points
list.
Select the point that should be displayed at the selected location. Press OK.
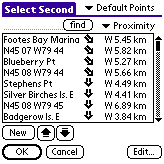 Do
the same for the second point. It is best to try to pick two points that
are as far away as possible. This gives the map calibrator more data to
perform the adjustments. When you select the second point, the Points
dialog appears prompting for the name of the known location.
Do
the same for the second point. It is best to try to pick two points that
are as far away as possible. This gives the map calibrator more data to
perform the adjustments. When you select the second point, the Points
dialog appears prompting for the name of the known location.
Choose this point and press OK. This will perform the map calibration. The Map Details dialog will be displayed showing the new top-left and bottom-right coordinates of the map.
To accept the changes press OK. Your known points should be displayed
on the map in their correct locations
- To ensure that the two points you will use are correct, physically
go to the point, and capture the exact coordinates of each point from
the GPS. I.e.. Point 1 = Corner Store, Point 2 = Home. If this is not
possible, try to determine the coordinates from a paper map, or pinpoint
them on an electronic map on the Web. I.e.. Mapquest.
- Select the Options-Calibrate Map menu options. The screen will be changed
to the Full Screen Map View. You are prompted to select the first point.
Scroll the map to a position of known coordinates. I.e. Corner store.
- Click on the map the location where the point SHOULD be. This brings
up the Points list. Select the point that should be displayed at the selected
location. In this case, choose the Corner Store point. Press OK.
- Do the same for the second point. I.e. Click where your home is on the
map, then select the Home point you captured earlier. Note. It is best
to try to pick two points that are as far away as possible, and not positioned
horizontal or perpendicular to each other. This gives the map calibrator
more data to perform the adjustments. Once calibrated, your known points
should be displayed on the map in their correct locations.
 Calibrate
using Nudge Controls
Calibrate
using Nudge Controls
When the option for calibrating using Nudge controls is selected, the
nudge control screen is shown.
Nudge moves adjusting the calibration of the map by geographical coordinates. This amount of adjustment is set by the nudge factor. The nudge factor is set in decimal degrees.
This screen contains a number of buttons for adjusting the coordinates
of the map. As well, a nudge factor can be set for adjusting the precision
to which to move the map.
 Adjusts the map towards
the corresponding direction by the given factor (nudge).
Adjusts the map towards
the corresponding direction by the given factor (nudge).
 Adjusts the map in
both directions horizontally or vertically by the given factor.
Adjusts the map in
both directions horizontally or vertically by the given factor.
 Adjusts the map in
both directions equally horizontally and vertically by the given factor.
Effect is to make the map appear to cover a larger or smaller geographical
space.
Adjusts the map in
both directions equally horizontally and vertically by the given factor.
Effect is to make the map appear to cover a larger or smaller geographical
space.
Note if the geographical width is not exactly the same as the height, then the map sizing movement will appear to be of different values horizontally and vertically, since the pixel coverage of a nautical mile (degree lat or lon) is different between width and height.
Calibrate
manually
Set the geographical (longitude-latitude) coordinates, projection type,
and datum of the map. See Map Details for more information
Options-Preferences
Settings for options such as units of display, track recording options, map display options, time estimation settings, and GPS configuration.
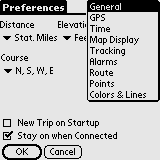
 Preferences
- General
Preferences
- General
Distance, Elevation, Volume, Course:
General settings for units of measure.
Position
Define the geographical coordinate display format. Latitude/Longitude,
UTM, or OSGB.
New Trip on Startup:
Automatically run the New Trip dialog when the progrm starts. Allows
you to choose your route instead of the program automatically starting
with the last used route and track log.
Stay on when Connected:
Override handheld's auto shutoff feature.
 Preferences
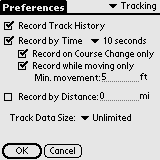
- Tracking
Preferences
- Tracking
Set track recording preferences.
Record Track History:
Saves recorded GPS location to a logging database while connected.
Track Data Size:
Control how large the track file can get.
Track Precision:
Control how often data is logged.
Record By Distance
Record track log point at distance intervals.
 Preferences
- Time Estimation
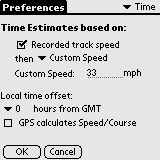
Preferences
- Time Estimation
Control how time-based estimates are calculated.
Time Estimates based on:
Recorded Track Speed: Report to the exact time it took previously
on a followed track. Applies only when following a recorded track.
Average Speed: Estimates based on current average speed.
Current Speed: Estimates based on current speed.
Custom Speed: Base time estimates on the specified average speed.
Local time offset: Add or subtract time extracted from GPS (Greenwich mean time).
GPS calculates Speed/Course: When On, use the speed reported by the GPS device as the current speed and course. When off, PathAway will calculate the current speed and course. This option is provide because some GPS devices report course and or speed incorrectly.
Preferences - Configure GPS
Preferences - Map Display
 Preferences
- Alarms
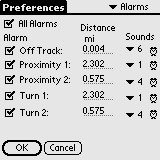
Preferences
- Alarms
Have audible alarms sound when you reach points of interest, or get off your route track. Set the distance threshold for the proximity point, and choose from one of the predefined alarm sounds.
All Alarms
Enable/Disable alarms
Off Track
Set the Off Track warning alarm distance, and sound. This alarm will
sound when you veer from the specified track by the off track distance.
The Off track alarm will continue to sound every 30 seconds while off-track.
Press the alarm clock to test the sound.
Proximity 1 and 2
Proximity alarms can be set to alert you at two separate proximity
distances. Different sounds can be set to notify you of when you are approaching
points. Proximity 1 is the early warning alarm. Proximity 2 is the Point
approaching alarm.
Turn 1 and 2
Turn instructions can be created by setting a route point to be an Intersection.
The Turn alarm settings will sound as you approach turns.
 Preferences
- Routes
Preferences
- Routes
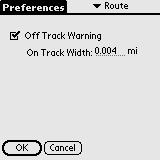
Route Preferences. Define preferences for navigating using routes.
Off Track Warning:
Defines distance to right or left of track you can get before Off-track
warning is triggered.
 Preferences
- Points
Preferences
- Points
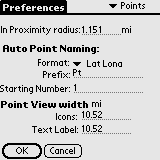
Preferences related to the display of points and naming
of new points.
In Proximity when within:
Defines the radius to search for points to display in proximity list.
Point Naming:
Define how new points are auto-named. Points can be automatically
named by geographical coordinate or be incrementing numeric ids.
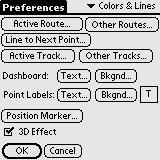
Preferences - Colors & Lines
The Colors and Lines dialog allows you to to improve the visibility of the navigation displays on the map. Select the preferences category dropdown and choose colors Color and Lines to activate this dialog. Here you can change the way the lines and colors on the maps are displayed. If you have a color device, you can create easy-to-read contrast between your maps and route and track lines. Experiment with this option until you've found a view that suits you. You can even change the look of the current Position Marker by selecting between 3 different styles.
|
|
|
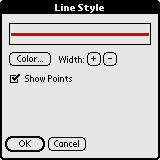
Active Route
Set the color and width of the Active route line. Can set whether
to show each route point mark as well. Brings up Line Style dialog.
Line to Next Point
Set the color and width of the line from the current position to the
next point on the route. These are shown when the preferences option "Show
All Tracks" is on. Can set whether to show each route point mark
as well. Brings up Line Style dialog.
Other Routes
Set the color and width of the non-active Route lines. These are shown
when the preferences option "Show All Tracks" is on.
Can set whether to show each route point mark as well. Brings up Line
Style dialog.
Active Track
Set the color and width of the Active track log line. Can set whether
to show each track point mark as well. Brings up Line Style dialog.
Other Tracks
Set the color and width of the non-active Track lines. These are shown
when the preferences option "Show All Tracks" is on.
Can set whether to show each track point mark as well. Brings up Line
Style dialog.
Entering Longitude/Latitude Coordinates
The geographical coordinates are specified vertical distance from the equator known as latitude, and horizontal distance from the Central meridian over Greenwich England, known as longitude. These coordinates are entered in one of three available formats: Hemisphere-Degrees-minutes, Hemisphere-Degrees-minutes-seconds, and decimal degrees. Latitude coordinates north of the equator are prefixed by 'N' or a positive number. Coordinates in the southern hemisphere are prefixed by 'S' or negative numbers.
Examples:
Hemisphere-Degrees-minutes:
N45 30.500, W79 30.500
* must be a space between degrees and minutes.
Hemisphere-Degrees-minutes-seconds:
N45 30 30.0, W79 30 30
* must be a space between degrees, minutes, and seconds.
Decimal degrees
45.505, -79.505
PathAway Tools
Installing
Install PathAway Tools on your Windows PC, by running the Install program PathAway3Install.exe. The install wizard will lead you through the steps of installing the software. Ensure the option for PathAway Tools is selected. Once completed PathAway Tools will be installed on your computer in the folder you specify and can be run from your Start-Programs menu.
Use the Map Manager to prepare maps for PathAway. The application is quite simple and straight forward. To prepare a map follow these steps:
Ensure the map is in either Jpeg or BMP format.
Run the Map Manager.
To import a map, choose from the menu Map-Import Map. Select your map from the dialog.
The Map Manager will convert the image into the format necessary to display
in PathAway.
Next, give the map a name, and set its color depth. The color depth must at least match your device's. Most Palm Powered™ devices support color depths that are equal to or less than the maximum available on the device. I.e. if your Palm Powered™ device supports up to 256 colors, then, 4-bit gray-scale maps will work.
You can enter the longitude and latitude coordinates at this time, if you know them. If not, it is sometimes easier to match them up to known geographical points. This is done once the maps are transferred on the Palm Powered™ device. (See section on Calibrating Maps).
The position coordinates can be specified by one of the following methods:
1) By top-left and bottom right or,
2) By the map center coordinates, and the total distance covered by the map. Total distance is in statute miles. To convert from nautical miles to statute miles, multiply nautical miles by 1.151. For Kilometers to Miles, multiply kilometers by 0.621
When you're done, save the map by selecting File-Save Map As. You will be prompted to save it with a .prc extension. You can also send the map directly to your HotSync folder by selecting File-Send Map to HotSync. Then, simply press the HotSync button to install the map on the Palm Powered™ device.
For importing pre-calibrated maps, PathAway Map manager supports .jpr calibration, .cal format, and Pathaway's own PWM format. See the Advanced Map Converter manual for details on these formats.
The Icon Manager allows you to create your own custom icons to represent Points, or mode of transportation icons.
If you haven't done so, download onto your PC, the sample icon and vehicle databases.
Once done, open up the Icon.prc file from the File-Open dialog. You'll see the list of icons already in the database. Each name for an icon must be followed by a ",P" (comma P). This is an indicator to PathAway that the image is a Point Icon. Similarly ",V" (comma V) indicates a vehicle icon.
Create your own icon using an application such as Windows Paint. Create an image no larger than 24 pixels wide by 14 pixels high. The average is 11x11. Save the file as a .BMP, or Jpeg.
Then, in the icon manager, choose Image-Add Image, and select the icon you just created.
That's it, now save the file, or send it to HotSync®. You're ready to use your new icon as a point.