PathAway - How To's
Using Google Earth Points in PathAway
Express Edition for iPhone/iPad/iPod
 |
 |
 |
Google Earth is a great way to browse and find Points of Interest along for a tour. Now it's very easy to capture these points in Google Earth and import and view them in PathAway. The following tutorial illustrates the steps to do this.
Google Earth Points in PathAway
Capture Points of Interest in Google Earth
Once you have copied your "Tutorial Trip.kml" to your PC, then it's time to run Google Earth. If you haven't installed Google Earth, then you should install it at this time. Google Earth can be downloaded at http://earth.google.com.
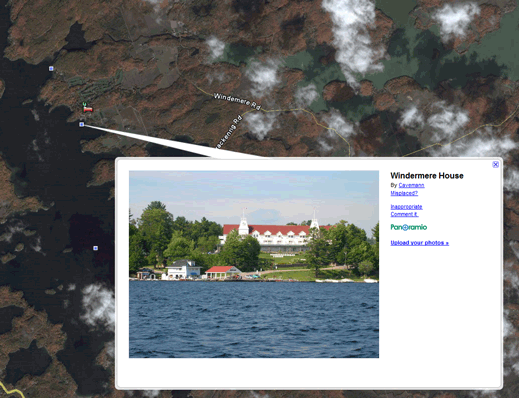
Now, run Google Earth. Ensure that the Layer "Points of Interest" is turned on, and do a search on "Windermere, ON". This will zoom the map to the small town of Windermere in the district of Muskoka. Windermere resides on Lake Rosseau which hosts many fine resorts and breathtaking views. On of the most beautiful is that of Windermere House. It is located in the town on Lake Rosseau. Scroll and zoom until you find "Windermere" house. It is represented by a ![]() icon. Tapping on this icon brings up information about Windermere house.
icon. Tapping on this icon brings up information about Windermere house.
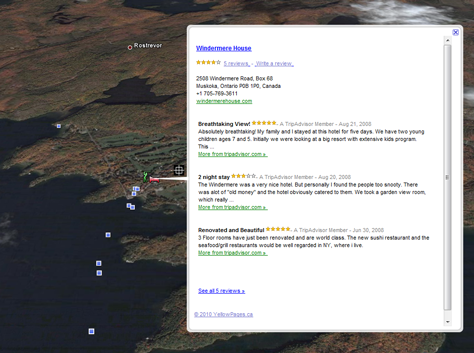
So this is a place you would like to save for your trip. To do so, right click on the Windermere icon, and choose "Save to My Places" from the menu. This will add the reference to your "My Places" list.
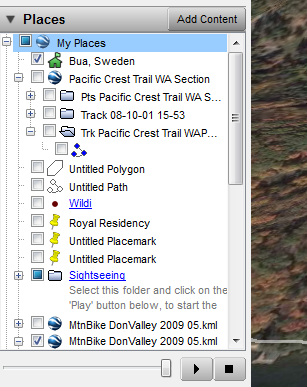
In order to create a list of points only for your tour, you will need to create a folder under My Places. So we'll create a folder called "Muskoka Points". To do this, right click on "My Places" at the top of the Places list and choose the menu "Add->Folder".
In the New Folder dialog, simply type in the Name of the folder (Muskoka Points) and press OK.
Next scroll to the newly create folder to see it was created successfully. Now, find the "Windermere" point you saved, and drag it into the "Muskoka Points" folder.
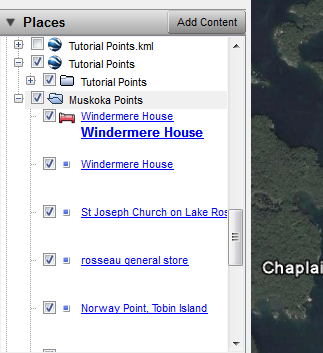
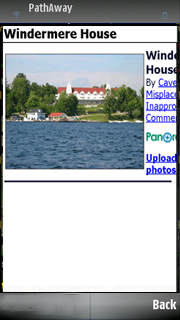
Continue to add as many points as you like to the Muskoka Points database. Some of the most interesting points are the Panoramio photos. Add the Windermere House panoramio image to your points list. We'll use this point to view in PathAway since it has a beautiful picture of the resort.
Saving your Points of Interest
Once you are satisfied that you have all of the points you need, right click on the "Muskoka Points" folder and choose "Save Place As".
In the "Save As", Ensure you choose "Kml" (not Kmz) as the "Save as type".
Choose a folder location that will make it easy to copy the file to your device.
Importing into PathAway
Once you have copied the "Muskoka Points.kml" file to your device folder, it's time to import them into PathAway. Run PathAway, then choose the menu "Data" and select the "Import..." dialog. In the "File Selector" dialog, browse to the correct folder and select the "Muskoka Points.kml" file, and press OK.
The points will now be imported. To go to a point, from the Point Databases dialog, tap and hold newly imported database, and choose "View Points" from the menu. In the "View Points" dialog, choose a point such as "Windermere House", then select the "Options->Show on Map" command. The point will now be centered on the map.
Viewing the Point Descriptions
You can now view the information on the points by selecting the middle "Select" button or by "Tapping and holding" on a point. This brings up the context menu. From this menu choose "Point->View Notes". The same description you used will also now be displayed in PathAway.
Note: In order to view external items such as images, or to browse to links on the page, you will need an Internet connection on your device.
Now you have all of the data you need to enjoy a tour of Lake Rosseau. When you are traveling and become in close proximity of any of these points, the bottom of the screen will highlight them. If there is a further description for the point, there will be a  icon beside the Point name.
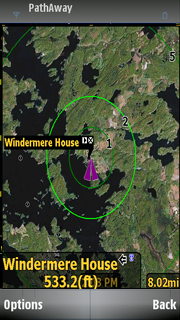
Simply tap on the title to bring up the full description page. Try a few more of the points you imported. If you bring up a description with links to other Web pages, these pages will be then replace the main page. Press the "Back" button to return to PathAway".
This concludes the tutorial for Creating a PathAway tour from Google Earth. Be sure to check out our other PathAway How To's for cool and interesting features in PathAway.