PathAway - Tips
Viewing PathAway Trips in Google Earth
Express Edition or higher for iPhone/iPad/iPod
 |
 |
 |
Now it's easier then ever to take the points, routes, and tracks you've created on your trip and view them in Google Earth. New features in PathAway provide the ability to display PathAway points, routes, and tracks, along with their proper icons. To export your trips and display them in Google Earth, follow this simple tutorial.
PathAway to Google Earth Tutorial
Ensure you have the PathAway tutorial data, namely the "Tutorial Points", and the "Footes Bay to Rosseau" route installed. These files can be found on PathAway.com
Exporting the Points to KML
In the "Data->Point Databases" screen, tap and hold on "Tutorial Points" and choose "Export...".
This will bring up a standard File selector dialog. Choose a location on your device to save your file. Ensure the selected type is "KML Files (*.kml)". Keep the name as "Tutorial Points"
Note, you should choose a location that you can easily find from your PC. Then follow the instructions in the User manual to move the file onto your device. You can use iTunes File sharing or other cloud service such as Dropbox or iCloud.
Viewing your Points in Google Earth
Once you have copied your KML file to your PC, then it's time to run Google Earth. If you haven't installed Google Earth, then you should install it at this time. Google Earth can be downloaded at http://earth.google.com.
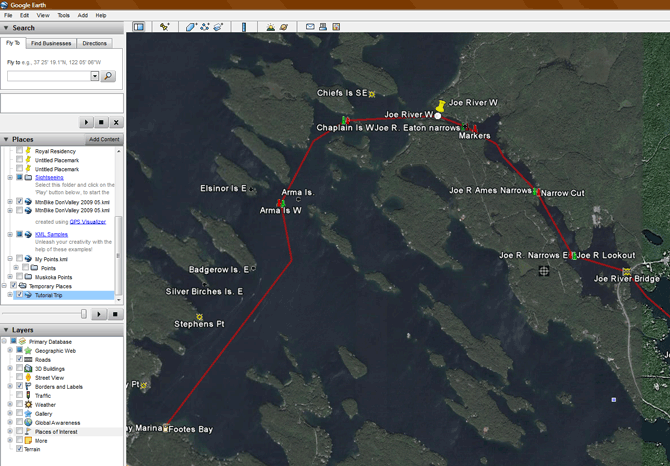
Now, run Google Earth and choose the menu "File->Open...". Browse to your KML file, select it and Open it. Google Earth will zoom to the extents of the trip and display the Points and Route. The Trip will be added to the "Temporary Places" section of the "Places" sidebar list.
You can now view all of the data in the Points by clicking on them on the map, or selecting them from the "Places" list.
Exporting a Route of Track log to KML
In the "Data->Routes" screen, tap and hold on "Footes Bay to Rosseau", then choose "Export...".
This will bring up a standard File selector dialog. Choose a location on your device to save your file. Ensure the selected type is "KML Files (*.kml)". Keep the name as "Tutorial Points"
Note, you should choose a location that you can easily find from your PC. Then follow the instructions in the User manual to move the file onto your device. You can use iTunes File sharing or other cloud service such as Dropbox or iCloud.
Viewing your Route in Google Earth
Once you have copied your "Tutorial Trip.kml" to your PC, then it's time to run Google Earth.
Run Google Earth and choose the menu "File->Open...". Browse to your KML file, select it and Open it. Google Earth will zoom to the extents of the trip and display the Points and Route. The Trip will be added to the "Temporary Places" section of the "Places" sidebar list.
To view a "Fly through" of the trip, select the "Footes Bay to Rosseau" route and press the "Play" button to play the entire tour.
Note: you can adjust the "Touring View" angle and distance view in the "View->Options..." dialog and choose the "Tour" tab. For this route, a Camera Tile Angle of 60 degrees, "Camera Range" of 4000 meters, and Speed of 500 provides a great visual tour.
This concludes the tutorial for "Viewing PathAway trips in Google Earth". Be sure to check out our other PathAway Tips for cool and interesting features in PathAway.